2007年 04月 的归档
前几天,由于要升级ubuntu,需要下载7.04的deaktop CD,但是由于我这边的网速本来就不好,加上linux下没有好的下载工具,导致下载了N次,最后还是到另一台电脑上用win+web迅雷才下载好的。
linux下是有很多下载工具:firefox自带的是单线程下载,速度肯定不会快;wget同理;axel虽然是多线程的,但是在命令行下毕竟不方便,而且它的多线程还不能动态调节,就是说如果某个线程先下载完了,不会去帮其他的线程下载剩余部分,效果也往往不佳;再就是d4x,这个东西声音倒是挺有意思的,搞的像游戏一样,但是很多网站的url跳转方式都不支持,只能说是个鸡肋;再就是MultiGet,曾经一度给了我很大的希望,但是我就是用这个工具,先是在www.ubuntu.com上选了好几个镜像,下载完以后,验证md5值发现出错了,我以为是几个镜像的文件不同步,所以又用http://releases.ubuntu.com/feisty/ubuntu-7.04-desktop-i386.iso这个地址重新下载了一次,结果4个小时后,再去验证md5值,还是令我失望了。后来在局域网里的另一台win上用web迅雷下载同一个地址,验证md5没有问题。
另外,linux下的BT客户端也很多,自己也试过几个,速度也都跟不上,而且大多有中文文件名乱码问题。
emule的客户端amule还好一点,速度慢点还能下载点东西,但是很多人都说速度很快的mldonkey在我的机子上就连服务器都连不上,不知道是不是我的RP有问题,唉,郁闷。 
发表于:2007年04月28日 22:04 | 分类: 流水帐 | 2 个评论 »
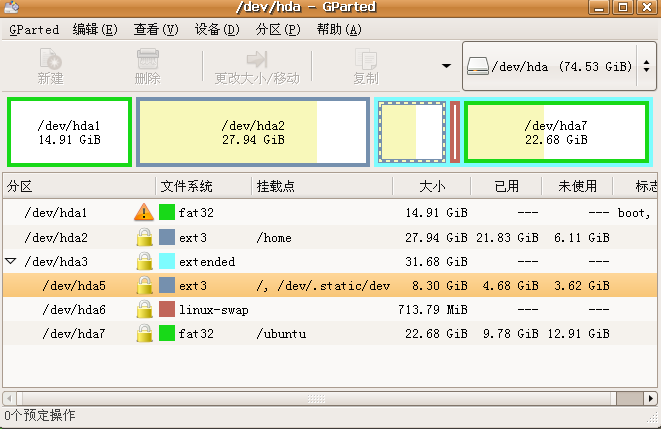
本文首先要讨论的是为什么要将好好的linux根分区给迁移掉,说到这个问题我就是一肚子火啊!原因就是windows的无理、霸道和BT,具体是这样的,我原先的分区情况如下图所示:

已经有4个主分区了,其中有一个swap分区,3个ext3格式的分区,本打算把最后一个ext3的分区删掉,建一个扩展分区,再在里面建两个fat32的逻辑分区,把XP安装在其中之一上。可能有的朋友已经发现我这样的想法基本上是无法实现的,试了很久都没有办法。究其原因可能有两点:
1、windows要求装在主分区上。
2、windows要往硬盘的第一个主分区(也就是/dev/hda1)上面写一些文件用于引导,但此时我的那个分区是ext3格式的,windows不认识。(唉,终于发现装windows还是要比装linux难一些的。)
好,接下来就只能无奈地把我的第一个主分区让给那个变态的windows了,但是我可不想就这样重装我的linux,所以就开始了我的根分区迁移历程了。我用的是ubuntu7.04的desktop CD来启动(没试过直接在运行着的linux下面复制文件,不过理论上也完全可行),启动好了以后,调整分区结构,如下图所示。
然后将原来的根分区和新的根分区分别mount到两个目录下面。执行
sudo cp -ax 原目录/* 新目录
这里一定要注意的是必须加上这个ax参数,否则的话,复制到新的分区后,所有文件的拥有者都会变成root,那麻烦可就大了,而cp命令的ax参数可以阻止这样的事情发生,它会把所有的文件权限按原样复制好。这一步可能要等比较久,等文件复制完毕以后,为了能让grub正确引导需要相应修改一些新目录/boot/grub/menu.lst这个文件,又为了能让系统自动挂载其他分区(包括/home分区),还要修改一下新目录/etc/fstab这个文件。具体的修改方法很多地方都有了,这里就不再讨论了。
另外,等装完windows以后还要在用desktop CD启动,重装一下grub才算完工,(再次鄙视windows都无理和霸道。)
发表于:2007年04月26日 22:09 | 分类: 备忘, 流水帐 | 没有评论 »
vmware原先是在6.10下安装的,6.10下运行没问题。系统升级后,重新配置,出现如下错误:
| 代码: |
#
lly@lly:~$ sudo vmware-config.pl
#
Making sure services for VMware Workstation are stopped.
#
#
Stopping VMware services:
#
Virtual machine monitor done
#
Bridged networking on /dev/vmnet0 done
#
DHCP server on /dev/vmnet1 done
#
Host-only networking on /dev/vmnet1 done
#
DHCP server on /dev/vmnet8 done
#
NAT service on /dev/vmnet8 done
#
Host-only networking on /dev/vmnet8 done
#
Virtual ethernet done
#
#
Configuring fallback GTK+ 2.4 libraries.
#
#
In which directory do you want to install the mime type icons?
#
[/usr/share/icons]
#
#
What directory contains your desktop menu entry files? These files have a
#
.desktop file extension. [/usr/share/applications]
#
#
In which directory do you want to install the application’s icon?
#
[/usr/share/pixmaps]
#
#
/usr/share/applications/vmware-workstation.desktop: warning: The ‘Application’ category is not defined by the desktop entry specification. Please use one of “AudioVideo”, “Audio”, “Video”, “Development”, “Education”, “Game”, “Graphics”, “Network”, “Office”, “Settings”, “System”, “Utility” instead
#
/usr/share/applications/vmware-player.desktop: warning: The ‘Application’ category is not defined by the desktop entry specification. Please use one of “AudioVideo”, “Audio”, “Video”, “Development”, “Education”, “Game”, “Graphics”, “Network”, “Office”, “Settings”, “System”, “Utility” instead
#
Trying to find a suitable vmmon module for your running kernel.
#
#
None of the pre-built vmmon modules for VMware Workstation is suitable for your
#
running kernel. Do you want this program to try to build the vmmon module for
#
your system (you need to have a C compiler installed on your system)? [yes]
#
#
Using compiler “/usr/bin/gcc”. Use environment variable CC to override.
#
#
What is the location of the directory of C header files that match your running
#
kernel? [/lib/modules/2.6.20-15-generic/build/include] /usr/src/linux-headers-2.6.20-15-generic/include
#
#
Extracting the sources of the vmmon module.
#
#
Building the vmmon module.
#
#
Using 2.6.x kernel build system.
#
make: Entering directory /tmp/vmware-config1/vmmon-only'
#
make -C /usr/src/linux-headers-2.6.20-15-generic/include/.. SUBDIRS=$PWD SRCROOT=$PWD/. modules
#
make[1]: Entering directory /usr/src/linux-headers-2.6.20-15-generic’
#
CC [M] /tmp/vmware-config1/vmmon-only/linux/driver.o
#
In file included from /tmp/vmware-config1/vmmon-only/linux/driver.c:80:
#
/tmp/vmware-config1/vmmon-only/./include/compat_kernel.h:21: 错误: expected declaration specifiers or ‘…’ before ‘compat_exit’
#
/tmp/vmware-config1/vmmon-only/./include/compat_kernel.h:21: 错误: expected declaration specifiers or ‘…’ before ‘exit_code’
#
/tmp/vmware-config1/vmmon-only/./include/compat_kernel.h:21: 警告: 在 ‘_syscall1’ 的声明中,类型默认为 ‘int’
#
make[2]: *** [/tmp/vmware-config1/vmmon-only/linux/driver.o] 错误 1
#
make[1]: *** [_module_/tmp/vmware-config1/vmmon-only] 错误 2
#
make[1]: Leaving directory /usr/src/linux-headers-2.6.20-15-generic'
#
make: *** [vmmon.ko] 错误 2
#
make: Leaving directory /tmp/vmware-config1/vmmon-only’
#
Unable to build the vmmon module.
#
#
For more information on how to troubleshoot module-related problems, please
#
visit our Web site at “http://www.vmware.com/download/modules/modules.html” and
#
“http://www.vmware.com/support/reference/linux/prebuilt_modules_linux.html”.
#
#
Execution aborted. |
上irc问了DkYu兄(在此表示感谢),得到如下解决办法:
| 代码: |
#
cd /usr/lib/vmware/modules/source
#
sudo cp vmmon.tar vmmon.tar.old
#
sudo tar xvf vmmon.tar
#
sudo gedit vmmon-only/include/compat_kernel.h
#
找到
static inline _syscall1(int, compat_exit, int, exit_code); 并
#
替换成
#
#if LINUX_VERSION_CODE < KERNEL_VERSION(2,6,19)
#
static inline _syscall1(int, compat_exit, int, exit_code);
#
#endif
#
sudo tar cvf vmmon.tar vmmon-only
#
sudo rm -rf vmmon-only |
意思是内核是2.6.20的话,就不需要这个东西拉,这样改了之后,再进行配置,结果还是报错,如下:
| 代码: |
1.
lly@lly:~$ sudo vmware-config.pl
2.
Making sure services for VMware Workstation are stopped.
3.
4.
Stopping VMware services:
5.
Virtual machine monitor done
6.
Bridged networking on /dev/vmnet0 done
7.
DHCP server on /dev/vmnet1 done
8.
Host-only networking on /dev/vmnet1 done
9.
DHCP server on /dev/vmnet8 done
10.
NAT service on /dev/vmnet8 done
11.
Host-only networking on /dev/vmnet8 done
12.
Virtual ethernet done
13.
14.
Configuring fallback GTK+ 2.4 libraries.
15.
16.
In which directory do you want to install the mime type icons?
17.
[/usr/share/icons]
18.
19.
What directory contains your desktop menu entry files? These files have a
20.
.desktop file extension. [/usr/share/applications]
21.
22.
In which directory do you want to install the application’s icon?
23.
[/usr/share/pixmaps]
24.
25.
/usr/share/applications/vmware-workstation.desktop: warning: The ‘Application’ category is not defined by the desktop entry specification. Please use one of “AudioVideo”, “Audio”, “Video”, “Development”, “Education”, “Game”, “Graphics”, “Network”, “Office”, “Settings”, “System”, “Utility” instead
26.
/usr/share/applications/vmware-player.desktop: warning: The ‘Application’ category is not defined by the desktop entry specification. Please use one of “AudioVideo”, “Audio”, “Video”, “Development”, “Education”, “Game”, “Graphics”, “Network”, “Office”, “Settings”, “System”, “Utility” instead
27.
Trying to find a suitable vmmon module for your running kernel.
28.
29.
None of the pre-built vmmon modules for VMware Workstation is suitable for your
30.
running kernel. Do you want this program to try to build the vmmon module for
31.
your system (you need to have a C compiler installed on your system)? [yes]
32.
33.
Using compiler “/usr/bin/gcc”. Use environment variable CC to override.
34.
35.
What is the location of the directory of C header files that match your running
36.
kernel? [/usr/src/linux-headers-2.6.20-15-generic/include]
37.
38.
Extracting the sources of the vmmon module.
39.
40.
Building the vmmon module.
41.
42.
Using 2.6.x kernel build system.
43.
make: Entering directory /tmp/vmware-config2/vmmon-only'
44.
make -C /usr/src/linux-headers-2.6.20-15-generic/include/.. SUBDIRS=$PWD SRCROOT=$PWD/. modules
45.
make[1]: Entering directory /usr/src/linux-headers-2.6.20-15-generic’
46.
CC [M] /tmp/vmware-config2/vmmon-only/linux/driver.o
47.
CC [M] /tmp/vmware-config2/vmmon-only/linux/hostif.o
48.
CC [M] /tmp/vmware-config2/vmmon-only/common/cpuid.o
49.
CC [M] /tmp/vmware-config2/vmmon-only/common/hash.o
50.
CC [M] /tmp/vmware-config2/vmmon-only/common/memtrack.o
51.
CC [M] /tmp/vmware-config2/vmmon-only/common/phystrack.o
52.
CC [M] /tmp/vmware-config2/vmmon-only/common/task.o
53.
CC [M] /tmp/vmware-config2/vmmon-only/common/vmx86.o
54.
CC [M] /tmp/vmware-config2/vmmon-only/vmcore/moduleloop.o
55.
LD [M] /tmp/vmware-config2/vmmon-only/vmmon.o
56.
Building modules, stage 2.
57.
MODPOST 1 modules
58.
CC /tmp/vmware-config2/vmmon-only/vmmon.mod.o
59.
LD [M] /tmp/vmware-config2/vmmon-only/vmmon.ko
60.
make[1]: Leaving directory /usr/src/linux-headers-2.6.20-15-generic'
61.
cp -f vmmon.ko ./../vmmon.o
62.
make: Leaving directory /tmp/vmware-config2/vmmon-only’
63.
The module loads perfectly in the running kernel.
64.
65.
This program previously created the file /dev/vmmon, and was about to remove
66.
it. Somebody else apparently did it already.
67.
68.
This program previously created the file /dev/parport0, and was about to remove
69.
it. Somebody else apparently did it already.
70.
71.
This program previously created the file /dev/parport1, and was about to remove
72.
it. Somebody else apparently did it already.
73.
74.
This program previously created the file /dev/parport2, and was about to remove
75.
it. Somebody else apparently did it already.
76.
77.
This program previously created the file /dev/parport3, and was about to remove
78.
it. Somebody else apparently did it already.
79.
80.
This program previously created the file /dev/vmnet0, and was about to remove
81.
it. Somebody else apparently did it already.
82.
83.
This program previously created the file /dev/vmnet1, and was about to remove
84.
it. Somebody else apparently did it already.
85.
86.
This program previously created the file /dev/vmnet8, and was about to remove
87.
it. Somebody else apparently did it already.
88.
89.
You have already setup networking.
90.
91.
Would you like to skip networking setup and keep your old settings as they are?
92.
(yes/no) [yes]
93.
94.
Extracting the sources of the vmnet module.
95.
96.
Building the vmnet module.
97.
98.
Using 2.6.x kernel build system.
99.
make: Entering directory /tmp/vmware-config2/vmnet-only'
100.
make -C /usr/src/linux-headers-2.6.20-15-generic/include/.. SUBDIRS=$PWD SRCROOT=$PWD/. modules
101.
make[1]: Entering directory /usr/src/linux-headers-2.6.20-15-generic’
102.
CC [M] /tmp/vmware-config2/vmnet-only/driver.o
103.
CC [M] /tmp/vmware-config2/vmnet-only/hub.o
104.
CC [M] /tmp/vmware-config2/vmnet-only/userif.o
105.
/tmp/vmware-config2/vmnet-only/userif.c: 在函数 ‘VNetCopyDatagramToUser’ 中:
106.
/tmp/vmware-config2/vmnet-only/userif.c:629: 错误: ‘CHECKSUM_HW’ 未声明 (在此函数内第一次使用)
107.
/tmp/vmware-config2/vmnet-only/userif.c:629: 错误: (即使在一个函数内多次出现,每个未声明的标识符在其
108.
/tmp/vmware-config2/vmnet-only/userif.c:629: 错误: 所在的函数内只报告一次。)
109.
make[2]: *** [/tmp/vmware-config2/vmnet-only/userif.o] 错误 1
110.
make[1]: *** [_module_/tmp/vmware-config2/vmnet-only] 错误 2
111.
make[1]: Leaving directory /usr/src/linux-headers-2.6.20-15-generic'
112.
make: *** [vmnet.ko] 错误 2
113.
make: Leaving directory /tmp/vmware-config2/vmnet-only’
114.
Unable to build the vmnet module.
115.
116.
For more information on how to troubleshoot module-related problems, please
117.
visit our Web site at “http://www.vmware.com/download/modules/modules.html” and
118.
“http://www.vmware.com/support/reference/linux/prebuilt_modules_linux.html”.
119.
120.
Execution aborted. |
结果自己依葫芦画瓢,把vmnet.tar给解压了,把里面的userif.c和bridge.c里面都CHECKSUM_HW给注释掉了,再进行配置,果然就可以了,哈哈。
我的vmware又正常啦!
发表于:2007年04月22日 18:24 | 分类: 故障分析 | 没有评论 »
官方网站:http://tor.eff.org
Tor 是一个工具集,帮助各类组织和个人增强互联网上活动的安全。 Tor 能够匿名 Web 浏览与发布、即时通讯、IRC、SSH 和其他基于 TCP 协议的应用。 Tor 同时提供了一个平台,软件开发人员能够在上面构建具有内建匿名性、安全性与隐私保护特性的新的应用程序。
Tor 的目标是抵御流量分析,流量分析是一种对网络的监视行为,这种行为会威胁个人的匿名与隐私,商业活动与业务关系的保密和国家的安全。通信在一个由叫做“洋葱路由器”的服务器所构建的分布式网络上传输,保护你以免网站构建你的兴趣简档,本地的、甚至是洋葱路由器上的窃听者阅读你的数据、了解你所访问的站点。
下面是我在ubuntu+firefox下的安装过程:
| 代码: |
| sudo apt-get install tor privoxy |
装完以后,需要修改prioxy的配置文件:
| 代码: |
| sudo gedit /etc/privoxy/config |
在最前面加上一行:
| 引用: |
| forward-socks4a / 127.0.0.1:9050 . |
| 代码: |
| sudo /etc/init.d/privoxy restart |
重启privoxy服务后就好了。
接下来要做的是在firefox里面启用tor,方法很见到,安装:torButton插件,并启用,ok了。
看看效果吧。
如果要在其他应用程序里面使用tor,方法见:http://tor.eff.org/docs/tor-doc-web.html
挂个图:

发表于:2007年04月16日 08:55 | 分类: 流水帐, 精华, 经验技巧 | 2 个评论 »
发表于:2007年04月08日 12:32 | 分类: 网站收集 | 没有评论 »
德国是个工业化程度很高的国家,说到奔驰、宝马、西门子、博世……没有人不知道,世界上用于核反应堆中最好的核心泵是在德国一个小镇上产生的。在这样一个发达国家,人们的生活一定是纸醉金迷灯红酒绿吧。
在去德国考察前,我们在描绘着、揣摩着这个国度。到达港口城市汉堡之时,我们习惯先去餐馆,公派的驻地同事免不了要为我们接风洗尘。走进餐馆,我们一行穿过桌多人少的中餐馆大厅,心里犯疑惑:这样冷清清的场面,饭店能开下去吗?更可笑的是一对用餐情侣的桌子上,只摆有一个碟子,里面只放着两种菜,两罐啤酒,如此简单,是否影响他们的甜蜜聚会?如果是男士买单,是否太小气,他不怕女友跑掉?
另外一桌是几位白人老太太在悠闲地用餐,每道菜上桌后,服务生很快给她们分掉,然后被她们吃光。
我们不再过多注意她们,而是盼着自己的大餐快点上来。驻地的同事看到大家饥饿的样子,就多点了些菜,大家也不推让,大有“宰”驻地同事的意思。
餐馆客人不多,上菜很快,我们的桌子很快被碟碗堆满,看来,今天我们是这里的大富豪了。
狼吞虎咽之后,想到后面还有活动,就不再恋酒菜,这一餐很快就结束了。结果还有三分之一没有吃掉,剩在桌面上。结完账,个个剔着牙,歪歪扭扭地出了餐馆大门。
出门没走几步,餐馆里有人在叫我们。不知是怎么回事:是否谁的东西落下了?我们都好奇,回头去看看。原来是那几个白人老太太,在和饭店老板叽哩呱啦说着什么,好像是针对我们的。
看到我们都围来了,老太太改说英文,我们就都能听懂了,她在说我们剩的菜太多,太浪费了。我们觉得好笑,这老太太多管闲事!“我们花钱吃饭买单,剩多少,关你老太太什么事?”同事阿桂当时站出来,想和老太太练练口语。听到阿桂这样一说,老太太更生气了,为首的老太太立马掏出手机,拨打着什么电话。
一会儿,一个穿制服的人开车来了,称是社会保障机构的工作人员。问完情况后,这位工作人员居然拿出罚单,开出50马克的罚款。这下我们都不吭气了,阿桂的脸不知道扭到哪里去了,也不敢再练口语了。驻地的同事只好拿出50马克,并一再说:“对不起!”
这位工作人员收下马克,郑重地对我们说:“需要吃多少,就点多少!钱是你自己的,但资源是全社会的,世界上有很多人还缺少资源,你们不能够也没有理由浪费!”
我们脸都红了。但我们在心里却都认同这句话。一个富有的国家里,人们还有这种意识。我们得好好反思:我们是个资源不是很丰富的国家,而且人口众多,平时请客吃饭,剩下的总是很多,主人怕客人吃不好丢面子,担心被客人看成小气鬼,就点很多的菜,反正都有剩,你不会怪我不大方吧。
事实上,我们真的需要改变我们的一些习惯了,并且还要树立“大社会”的意识,再也不能“穷大方”了。那天,驻地的同事把罚单复印后,给每人一张做纪念,我们都愿意接受并决心保存着。阿桂说,回去后,他会再复印一些送给别人,自己的一张就贴在家里的墙壁上,以便时常提醒自己
钱是您的,但资源是大家的!
————–
转自云帆论坛:http://www.myswear.net/forum/viewthread.php?tid=7964
发表于:2007年04月03日 21:48 | 分类: 其他, 流水帐 | 没有评论 »
参照http://forum.ubuntu.org.cn/viewtopic.php?t=46369&highlight=eva。
编译了新的eva,但为什么还是不能输入那个可恶的验证码呢?,呵呵。
编译的中间出现了
| 代码: |
| checking for X… configure: error: Can’t find X includes. Please check your installation and add the correct paths! |
安装kdelibs4-dev包即可解决。
发表于:2007年04月03日 20:58 | 分类: 备忘 | 没有评论 »