分类: '经验技巧' 的归档
用了beryl后mplayer不能全屏的解决办法
自从用了beryl,mplayer就一直不太正常,试了几个vo选项都有这样那样的问题,正常一点的要算x11了,只不过,全屏播放的适合边上都是黑的,画面并没有放大,以下是解决办法:
| 代码: |
| gedit ~/.mplayer/config |
输入(或修改):
| 引用: |
| # Enable software scaling (powerful CPU needed). # Some video output drivers (svga, x11, vesa) do not support hardware scaling. zoom=yes |
再打开一切正常了。
{原创}架设个人电台软件种种。。。
写在前面:本文只是简单地比较了一下windows下建立个人电台的几种方法,各个软件的详细介绍和配置方法,可以参考这里,或者自己google一下。
自从写了个只动下载baidu新歌top100都shell脚本后,就渐渐地喜欢上了听歌。在家里听,在公司里上班写程序时也喜欢边听着歌。但是,独乐乐不如众乐乐(这也是所谓的Ubuntu精神嘛!呵呵!),听多了,就越来越想和同事一起听了,于是就找了个架设个人网上电台的软件,由于是在公司干的,所以以下软件都是指windows下的软件,嘿嘿。
首先进入我视野的就是COWON公司的软件JetAudio,JetAudio本身是一款播放器,但里面集成了JetCast,是用于架设网络电台的。可能是由于本身就是做播放器出生的,所以这个软件都特点就是使用超级简单,架个电台就像用播放器放歌一样简单。而且功能也相当强大,支持话筒和mp3文件的混音,支持mp3、Ogg、WMA等格式的输出流,可以调节输出流的比特率,也支持淡入淡出等高级功能,还可以用浏览器访问http://yourIP:yourPort,页面显示服务器状态、当前在线人数、当前播放歌曲名等,这个网页对电台的宣传很有用。另外JetCast还有一个好处就是在安装目录下面有个content子目录,里面默认有个index.html文件,嘿嘿,也许你已经想到了,这个就是刚才说的那个网页的源代码,稍微熟悉点HTML的朋友就可以通过修改这个文件来建立一个自己电台的主页了,哈哈。
原本以为用了JetCast就可以高枕无忧了,但是好景不长,某天突然发现同事们都无法连上来了,打开http://yourIP:yourPort,没有出现熟悉的页面,却是一句“Service is currently down”的错误提示。于是重启服务器,发现还是一样的错误,一急,把JetCast卸了重装,发现确实好了,但是过了一会儿就发现又坏了!真是气死我了,把我好不容易拉来的听众都吓跑了!也曾去官方网站寻求原因,后来才知道,这个软件已经停止开发很久了,里面很多bug都没有来得及修改,所以使用中指不定会发生什么,不推荐新手以外的人士使用,呵呵。
于是无奈地开始找其他软件代替之,也试了很多的软件,比如一个什么微软的解码器,发现只能输出wma的流,而且很占服务器资源(毕竟的公司的电脑还是要用来工作的,总不能只开着个电台服务吧,嘿嘿),于是马上放弃;还有试了Real公司的Helix,发现似乎确实很专业(好像正版的不少钱哦!),但配置起来也是相当的“专业”,不研究个十天半个月好真难搞定(好像夸张了点,哈哈),而且资源占用也比较大,于是再次放弃。
后来发现了NULLSoft公司的SHOUTcast,这是个电台的服务端,起一个数据转换、转发的作用,需要从其他软件或者声卡获得声音输入才能工作。这个服务端软件占用的系统资源相当的小,软件本身的ReadME文件里的说明是说只需要90MHZ的CPU就可以运行,哈哈。
但是只有SHOUTcast是远远不够的,它还需要一个播放器来输出音频数据才行,第一个想到的当然是同出于一家的Winamp,这也是官方网站推荐的,另外还需要装一个winamp的插件(SHOUTcast DSP)来把winamp的数据发送给SHOUTcast服务器。于是下了winamp2.9.1,虽然winamp有很多新版本的,但新版本的资源占用较大,而且这个版本比较稳定,最重要的是SHOUTcast DSP不支持winamp3.X以上版本。再下载了前面说的SHOUTcast DSP。安装时注意SHOUTcast DSP要和winamp装在相同目录下,因为是插件嘛!
依次装上后,先按需要修改SHOUTcast安装目录下的ini配置文件,一般只需要修改最大听众数、端口、密码和管理员密码等几项就可以了。注意了,这里的Password=后面的这个密码是连接源的密码也就是后面winamp插件用的密码,而AdminPassword=后面的这个密码是管理员密码。修改完毕后就可以双击图标运行SHOUTcast服务器了。
SHOUTcast服务器运行起来后下面就是打开winamp,在选项-DSP插件里面启用SHOUTcast DSP,这样就会出来一个SHOUTcast DSP的设置窗口了,在里面输入SHOUTcast服务器的密码后,就可以连接上了,到这里电台也算架设完毕了。
用户可以和JetCast时一样的方法收听你的音乐,也可以访问你的网站,不过在访问你网站的时候就会发现,里面根本就没有中文,哈哈,这就是这个组合的不好之处啦。到现在我们也有必要推出下一个软件组合了,那就是SHOUTcast+foobar+oddcast plugin for foobar。有必要说明一下,oddcast有for foobar的插件也有for winamp的插件,还有stand alone的。
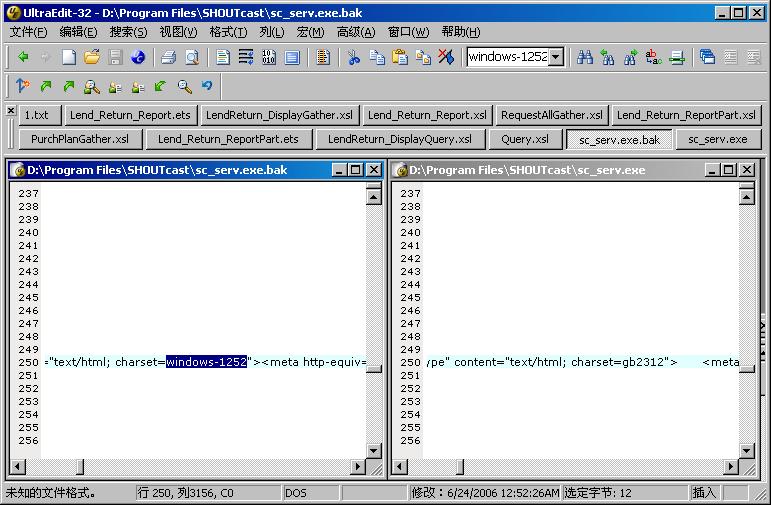
装好foobar以后,将oddcast plugin也装到foobar的安装目录里面,启动foobar,再在设置里面启用oddcast这个插件,然后配置一下源密码等信息,测试一下,发现其他问题应该都没有了,只是访问http://yourIP:yourPort的时候,看到的中文依然是乱码。但其时此时只要在浏览器里面将编码设置成gb2312,就已经不会乱码了。当然再刷新一下或者访问其他链接的时候还是一样乱码。而造成乱码的原因其时也很简单,那就是页面的源代码里面指定了文字编码为windows-1252了,唉,谁让这软件是老外写的呢?没有考虑到中文问题也不能怪人家阿。但是事情总会有解决的办法的,用ultraedit打开可执行文件一看,哈哈,windows-1252就在第250行呢(注意,ultraedit打开exe文件后,默认是16进制模式的,要先调成文本模式才可以搜索和编辑),赶快将它改成gb2312,这里要小心了,字符串“windows-1252”比“gb2312”长几个字节,千万不能把这几个字节给删了,不然可能会有不可预知的严重后果,最好的办法就是用空格填充,注意不能多一个空格也不少一个空格,如图。
保存后,再启动SHOUTcast,发现乱码问题也已经得到解决了。
总结:
JetCast简单易用,功能较强,但是bug较多不稳定。
SHOUTcast+winamp+SHOUTcast plugin 不支持中文标签。
SHOUTcast+foobar+oddcast plugin for foobar 目前看来最实用的方法了,稍加改造可以解决中文标签问题,当然比起JetCast来,还少了个定制网页的功能,谁有更好的解决办法的话,记得告诉我哦。
另外介绍一个必看的网站,http://www.geocities.com/peercast_listener/index.htm,里面有各种电台软件的详细介绍,本文只是简介,如有不清楚的地方相信一定可以在这里找到答案。
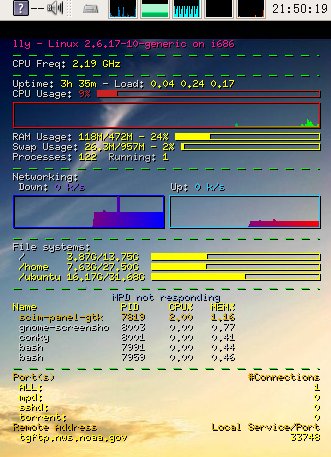
conky的配置
conky这东西不错,但是以前好像是叫torsmo的,不知道什么时候改名了!呵呵。在网上找了一下它的配置,发现这篇文章还不错,E文的原文在: http://conky.sourceforge.net/gnome.html
转一下:
| 引用: |
| Conky and Gnome How to configure gnome and conky to work together.1) Overview 1)概述The purpose of this document is to give a basic understanding of how to use Conky with the Gnome Window Manager. Gnome uses, by default, a file manager called nautilus, which also manages the icons on the desktop. For some reason, the way nautilus draws the icons to the desktop, conflicts with conky drawing to the desktop, usually causing the icons to disappear, or causing conky to show, then quickly disappear until it’s next update. Here, I will present a few ways to get around this. 这篇文档的目的是给一些关于如何在Gnome管理器中使用Conky的基本理解。Gnome下默认的文件管理器叫nautilus,它同样也用来管理图标和桌面。通常由于某些原因,nautilus在桌面上描绘图标与conky冲突,通常会造成桌面上图标消失不见,或者是conky消失,然后在更新时又迅速出现。这儿,我将要介绍一些关于这个的方法。 2) First Solution – Conky and devilspie By default, conky will draw to the “root” window (your desktop). This is what causes the conflict with nautilus. That being said, conky can operate fairly well with just it’s -o (own window) option. NOTE: In order to get conky to draw it’s own window, you must either run conky as The only problem with telling conky to draw it’s own window in gnome, is that it will appear on only a single virtual desktop, and it will show on the pager and takbar. In order to fix this, you must use a Window Management program (some examples include wmctrl and devilspie). For this example, I will show you how to configure devilspie (versions <=0.12 and >=0.13) to spread conky across all desktops and hide it from the pager and taskbar. First, Install devilspie. (This may vary by distribution) Homepage: http://www.burtonini.com/blog/computers/devilspie Next, you will have to configure devilspie. Please make sure you configure it for the CORRECT VERSION. The configuration CHANGED as of devilspie version 0.13, and it is NOT compatible with previous configurations. Version 0.12 and below: Create a file called .devilspie.xml in your user’s home (~) directory. A basic configuration of devilspie is as follows: Code: <?xml version=”1.0″?> Version 0.13 and later: Create a file called conky.ds in a directory called .devilspie your user’s home (~) directory (to create the directory, use Code: (if (matches (window_name) “.*conky”) (begin pin (skip_pager) (skip_tasklist))) Configuring Gnome Once conky and devilspie are properly configured, you can make them both automatically start when Gnome starts. 3) Second Solution – Disabling Nautilus Rather than installing devilspie (or another window management application), some users may find it helpful to instead keep nautilus from drawing to the root window. To do this, run gconf-editor and uncheck show_desktop in Apps/Nautilus/Preferences/. The downside of disabling nautilus from drawing to the root window is that you will no longer have icons on the desktop, or be able to right-click on the desktop. This project is also generously hosted by sourceforge. SourceForge.net Logo Valid XHTML 1.0 Strict Valid CSS! |
下面是我的配置文件:
# Conky sample configuration
#
# the list of variables has been removed from this file in favour
# of keeping the documentation more maintainable.
# Check http://conky.sf.net for an up-to-date-list.# set to yes if you want Conky to be forked in the background
background no# X font when Xft is disabled, you can pick one with program xfontsel
#font 5×7
font 6×10
#font 7×13
#font 8×13
#font 9×15
#font *mintsmild.se*
#font -*-*-*-*-*-*-34-*-*-*-*-*-*-*# Use Xft?
use_xft no# Set conky on the bottom of all other applications
on_bottom yes# Xft font when Xft is enabled
xftfont Bitstream Vera Sans Mono:size=8# Text alpha when using Xft
xftalpha 0.8# Print everything to stdout?
# out_to_console no# MPD host/port
# mpd_host localhost
# mpd_port 6600
# mpd_password tinker_bell# Print everything to console?
# out_to_console no# mail spool
# mail_spool $MAIL# Update interval in seconds
update_interval 0.5# This is the number of times Conky will update before quitting.
# Set to zero to run forever.
total_run_times 0# Create own window instead of using desktop (required in nautilus)
own_window yes# If own_window is yes, you may use type normal, desktop or override
own_window_type override# Use pseudo transparency with own_window?
own_window_transparent yes# If own_window_transparent is set to no, you can set the background colour here
own_window_colour hotpink# If own_window is yes, these window manager hints may be used
#own_window_hints undecorated,below,sticky,skip_taskbar,skip_pager# Use double buffering (reduces flicker, may not work for everyone)
double_buffer yes# Minimum size of text area
minimum_size 280 5# Draw shades?
draw_shades yes# Draw outlines?
draw_outline no# Draw borders around text
draw_borders no# Draw borders around graphs
draw_graph_borders yes# Stippled borders?
stippled_borders 8# border margins
border_margin 4# border width
border_width 1# Default colors and also border colors
default_color yellow1
default_shade_color black
default_outline_color black# Text alignment, other possible values are commented
#alignment top_left
alignment top_right
#alignment bottom_left
#alignment bottom_right
#alignment none# Gap between borders of screen and text
# same thing as passing -x at command line
gap_x 12
gap_y 12# Subtract file system buffers from used memory?
no_buffers yes# set to yes if you want all text to be in uppercase
uppercase no# number of cpu samples to average
# set to 1 to disable averaging
cpu_avg_samples 2# number of net samples to average
# set to 1 to disable averaging
net_avg_samples 2# Force UTF8? note that UTF8 support required XFT
override_utf8_locale yes# Add spaces to keep things from moving about? This only affects certain objects.
use_spacer no# mldonkey_hostname Hostname for mldonkey stuff, defaults to localhost
# mldonkey_port Mldonkey port, 4001 default
# mldonkey_login Mldonkey login, default none
# mldonkey_password Mldonkey password, default none# boinc (seti) dir
# seti_dir /opt/seti# Allow for the creation of at least this number of port monitors (if 0 or not set, default is 16)
#min_port_monitors 16# Allow each port monitor to track at least this many connections (if 0 or not set, default is 256)
#min_port_monitor_connections 256# none, xmms, bmp, audacious, infopipe (default is none)
#xmms_player none# variable is given either in format $variable or in ${variable}. Latter
# allows characters right after the variable and must be used in network
# stuff because of an argument# stuff after ‘TEXT’ will be formatted on screen
TEXT
${color DeepPink1}$nodename – $sysname $kernel on $machine
${color green}$stippled_hr
${color lightgrey}CPU Freq:$color $freq_dyn_g GHz
${color green}$stippled_hr
${color lightgrey}Uptime:$color $uptime ${color lightgrey}- Load:$color $loadavg
${color lightgrey}CPU Usage:${color #cc2222} $cpu% ${cpubar}
${color red}${cpugraph 0000ff 00ff00}
${color lightgrey}RAM Usage:$color $mem/$memmax – $memperc% ${membar}
${color lightgrey}Swap Usage:$color $swap/$swapmax – $swapperc% ${swapbar}
${color lightgrey}Processes:$color $processes ${color grey}Running:$color $running_processes
${color green}$stippled_hr
${color lightgrey}Networking:
Down:${color #8844ee} ${downspeed eth0} k/s${color lightgrey} ${offset 80}Up:${color #22ccff} ${upspeed eth0} k/s
${color #0000ff}${downspeedgraph eth0 32,150 ff0000 0000ff} ${color #22ccff}${upspeedgraph eth0 32,150 0000ff ff0000}
${color green}$stippled_hr
${color lightgrey}File systems:
/ $color${fs_used /}/${fs_size /} ${fs_bar /}
/home $color${fs_used /home}/${fs_size /home} ${fs_bar /home}
/ubuntu $color${fs_used /ubuntu}/${fs_size /ubuntu} ${fs_bar /ubuntu}
${color green}$stippled_hr
${color #88aadd}${alignc}$mpd_status
${color}Name PID CPU% MEM%
${color #ddaa00} ${top name 1} ${top pid 1} ${top cpu 1} ${top mem 1}
${color lightgrey} ${top name 2} ${top pid 2} ${top cpu 2} ${top mem 2}
${color lightgrey} ${top name 3} ${top pid 3} ${top cpu 3} ${top mem 3}
${color lightgrey} ${top name 4} ${top pid 4} ${top cpu 4} ${top mem 4}
${color lightgrey} ${top name 5} ${top pid 5} ${top cpu 5} ${top mem 5}
${color green}$stippled_hr
${color #ddaa00}Port(s)${alignr}#Connections
$color ALL: ${alignr}$color ${tcp_portmon 1 65535 count}
$color mpd: ${alignr}$color ${tcp_portmon 6600 6600 count}
$color sshd: ${alignr}$color ${tcp_portmon 22 22 count}
$color torrent: ${alignr}$color ${tcp_portmon 6881 6999 count}
${color #ddaa00}Remote Address ${alignr} Local Service/Port$color
${tcp_portmon 1 65535 rhost 0} ${alignr} ${tcp_portmon 1 65535 lservice 0}
${tcp_portmon 1 65535 rhost 1} ${alignr} ${tcp_portmon 1 65535 lservice 1}
${tcp_portmon 1 65535 rhost 2} ${alignr} ${tcp_portmon 1 65535 lservice 2}
${tcp_portmon 1 65535 rhost 3} ${alignr} ${tcp_portmon 1 65535 lservice 3}
${tcp_portmon 1 65535 rhost 4} ${alignr} ${tcp_portmon 1 65535 lservice 4}
${tcp_portmon 1 65535 rhost 5} ${alignr} ${tcp_portmon 1 65535 lservice 5}
${tcp_portmon 1 65535 rhost 6} ${alignr} ${tcp_portmon 1 65535 lservice 6}
${tcp_portmon 1 65535 rhost 7} ${alignr} ${tcp_portmon 1 65535 lservice 7}
${tcp_portmon 1 65535 rhost 8} ${alignr} ${tcp_portmon 1 65535 lservice 8}
${tcp_portmon 1 65535 rhost 9} ${alignr} ${tcp_portmon 1 65535 lservice 9}
${tcp_portmon 1 65535 rhost 10} ${alignr} ${tcp_portmon 1 65535 lservice 10}
${tcp_portmon 1 65535 rhost 11} ${alignr} ${tcp_portmon 1 65535 lservice 11}
${tcp_portmon 1 65535 rhost 12} ${alignr} ${tcp_portmon 1 65535 lservice 12}
${tcp_portmon 1 65535 rhost 13} ${alignr} ${tcp_portmon 1 65535 lservice 13}
${tcp_portmon 1 65535 rhost 14} ${alignr} ${tcp_portmon 1 65535 lservice 14}
终于把mid3v2命令加到下载百度歌曲的脚本里面了
如下,程序会自动判断有没有安装mid3v2,如果装了就会把下载的歌曲原来的id3信息删掉,再设置歌曲名和歌手名,再也不怕歌曲里有乱七八糟的广告信息了。
| 代码: |
| #!/bin/bash #Copyright (c) 2005 ubuntu.org.cn #License: GPLv2 #强烈建议安装axel(多线程下载工具)和mid3v2(包含在python-mutagen里,用于修改歌曲的id3信息)#mp3的地址 SOURCE=”http://list.mp3.baidu.com/list/newhits.html” #保存mp3的目录 #下载重试次数 #临时目录 #创建下载目录 #创建临时下载目录 echo “开始下载百度最新100首歌曲列表” #转换网页编码 grep ” href=\”http://mp3.baidu.com/m” |\ #将mp3list.txt所有开头的空格去掉 #将mp3list.txt所有开头的tab去掉 #将mp3list.txt所有全角空格去掉 #将所有的回车符去掉 #在td>,后面加上回车符,一行表示一个mp3文件。 #删除<td width=”30%”> <td> </td> <td…FFFFFF”> <p> </p> #删除</a>…”_blank”> #删除& #得到:<a href=”http://mp3.baidu.com/m?tn=baidump3&ct=134217728&lm=-1&li=2&word=Baby%20Baby%20tell%20me%20%CD%F5%D0%C4%C1%E8″ target=”_blank”>Baby ,Baby tell me-王心凌</a> #取得行号,循环 #检查是否已经下载过这首歌,如果下载过,放弃 echo “开始通过 $url 下载 $name”; #down.txt为有效的下载地址 #size.txt为有效的下载文件大小 #down.txt与size.txt合并而在的down_size.txt文件中字段之间以” #排序 #去掉后面的尺寸 ##### 析取出mp3 的下载地址或 wma的下载地址 ############## downline_mp3=$(awk 'END{print NR}' ${TMP}/down_mp3.txt); #如果下载成功继续下其余的歌 # 如果没有mp3格式的则下载wma格式的歌 #echo -e "\e[1;6m\e[1;31m中转页面地址为${mp3}\e[1;6m\e[00m" ((i++)) |
自己改的下载百度新歌TOP100的脚本。哈哈!
这是我自己改的下载百度新歌TOP100的脚本,哈哈。小的不才,以前从没有写过shell脚本,如有什么不妥,请不吝赐教!
由于对某些服务器(特别是限制了单线程速度的服务器),wget下载速度太慢了。脚本默认使用axel多线程下载工具进行下载,如果没有axel,可以执行sudo apt-get install axel进行安装,或者把含有“axel”的两行注释,用下面“wget”的两行代替即可。
| 代码: |
| #!/bin/bash #Copyright (c) 2005 ubuntu.org.cn #License: GPLv2 #原脚本见http://forum.ubuntu.org.cn/viewtopic.php?t=2391&sid=910a60e55961be5f927b82595c2ddc29 # #由于baidu的问题,导致原脚本不能正确下载,所以由 bones7456 再次修改,欢迎大家使用。 #wget太慢了。脚本默认使用axel多线程下载工具进行下载,如果没有axel,可以执行sudo apt-get install axel进行安装,或者把含有“axel”的两行注释,用下面“wget”的两行代替即可。#mp3的地址 SOURCE=”http://list.mp3.baidu.com/list/newhits.html” #保存mp3的目录 #下载重试次数 #临时目录 #创建下载目录 #创建临时下载目录 echo “开始下载百度最新100首歌曲列表” #转换网页编码 grep “<a href=\”http://mp3.baidu.com/m” |\ #将mp3list.txt所有开头的空格去掉 #将mp3list.txt所有开头的tab去掉 #将mp3list.txt所有全角空格去掉 #将所有的回车符去掉 #在td>,后面加上回车符,一行表示一个mp3文件。 #删除<td width=”30%”> <td> </td> <td…FFFFFF”> <p> </p> #删除</a>…”_blank”> #删除& #得到:<a href=”http://mp3.baidu.com/m?tn=baidump3&ct=134217728&lm=-1&li=2&word=Baby%20Baby%20tell%20me%20%CD%F5%D0%C4%C1%E8″ target=”_blank”>Baby ,Baby tell me-王心凌</a> #取得行号,循环 #检查是否已经下载过这首歌,如果下载过,放弃 echo “开始通过 $url 下载 $name”; #down.txt为有效的下载地址 #size.txt为有效的下载文件大小 #down.txt与size.txt合并而在的down_size.txt文件中字段之间以” #排序 #去掉后面的尺寸 ##### 析取出mp3 的下载地址或 wma的下载地址 ############## downline_mp3=$(awk 'END{print NR}' ${TMP}/down_mp3.txt); axel -n 7 -a -o "${TMP}/${name}.mp3" "${realURL}" #如果下载成功继续下其余的歌 # 如果没有mp3格式的则下载wma格式的歌 #echo -e "\e[1;6m\e[1;31m中转页面地址为${mp3}\e[1;6m\e[00m" axel -n 7 -a -o "${TMP}/${name}.wma" "${realURL}" ((i++)) |


独立的flash播放器
[  心情: Happy ]
以前都用firefox看flash,倒也没什么不好!就是玩flash游戏的时候,按方向键有时侯会没用(估计是键盘事件被浏览器接收了没传给flash插件吧)!所以一直想找个独立的flash播放器。于是乎就下了个Flash6.0独立播放器。但是运行的时候发现还少个什么库,就参照eexpress老兄的方法:
| 代码: |
| $ sudo apt-get install libstdc++2.10-glibc2.2 |
没想到这么顺利,果然就可以了!哈哈!
ubuntu下也可以用win键啦~
[  心情: Amused ]
键盘上有个win键,却没有任何用处!很不爽吧!所以今天我就搜索了一把!结果找到了这个:
http://forum.ubuntu.org.cn/viewtopic.php?t=14422
按里面的说明改了一下,果然很爽!现在我按win+E就可以打开gedit,win+R就可以打开终端,还有win+Q就可以打开LumaQQ啦! ![]()