conky的配置
conky这东西不错,但是以前好像是叫torsmo的,不知道什么时候改名了!呵呵。在网上找了一下它的配置,发现这篇文章还不错,E文的原文在: http://conky.sourceforge.net/gnome.html
转一下:
| 引用: |
| Conky and Gnome How to configure gnome and conky to work together.1) Overview 1)概述The purpose of this document is to give a basic understanding of how to use Conky with the Gnome Window Manager. Gnome uses, by default, a file manager called nautilus, which also manages the icons on the desktop. For some reason, the way nautilus draws the icons to the desktop, conflicts with conky drawing to the desktop, usually causing the icons to disappear, or causing conky to show, then quickly disappear until it’s next update. Here, I will present a few ways to get around this. 这篇文档的目的是给一些关于如何在Gnome管理器中使用Conky的基本理解。Gnome下默认的文件管理器叫nautilus,它同样也用来管理图标和桌面。通常由于某些原因,nautilus在桌面上描绘图标与conky冲突,通常会造成桌面上图标消失不见,或者是conky消失,然后在更新时又迅速出现。这儿,我将要介绍一些关于这个的方法。 2) First Solution – Conky and devilspie By default, conky will draw to the “root” window (your desktop). This is what causes the conflict with nautilus. That being said, conky can operate fairly well with just it’s -o (own window) option. NOTE: In order to get conky to draw it’s own window, you must either run conky as The only problem with telling conky to draw it’s own window in gnome, is that it will appear on only a single virtual desktop, and it will show on the pager and takbar. In order to fix this, you must use a Window Management program (some examples include wmctrl and devilspie). For this example, I will show you how to configure devilspie (versions <=0.12 and >=0.13) to spread conky across all desktops and hide it from the pager and taskbar. First, Install devilspie. (This may vary by distribution) Homepage: http://www.burtonini.com/blog/computers/devilspie Next, you will have to configure devilspie. Please make sure you configure it for the CORRECT VERSION. The configuration CHANGED as of devilspie version 0.13, and it is NOT compatible with previous configurations. Version 0.12 and below: Create a file called .devilspie.xml in your user’s home (~) directory. A basic configuration of devilspie is as follows: Code: <?xml version=”1.0″?> Version 0.13 and later: Create a file called conky.ds in a directory called .devilspie your user’s home (~) directory (to create the directory, use Code: (if (matches (window_name) “.*conky”) (begin pin (skip_pager) (skip_tasklist))) Configuring Gnome Once conky and devilspie are properly configured, you can make them both automatically start when Gnome starts. 3) Second Solution – Disabling Nautilus Rather than installing devilspie (or another window management application), some users may find it helpful to instead keep nautilus from drawing to the root window. To do this, run gconf-editor and uncheck show_desktop in Apps/Nautilus/Preferences/. The downside of disabling nautilus from drawing to the root window is that you will no longer have icons on the desktop, or be able to right-click on the desktop. This project is also generously hosted by sourceforge. SourceForge.net Logo Valid XHTML 1.0 Strict Valid CSS! |
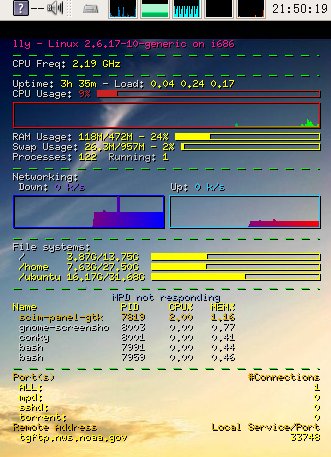
下面是我的配置文件:
# Conky sample configuration
#
# the list of variables has been removed from this file in favour
# of keeping the documentation more maintainable.
# Check http://conky.sf.net for an up-to-date-list.# set to yes if you want Conky to be forked in the background
background no# X font when Xft is disabled, you can pick one with program xfontsel
#font 5×7
font 6×10
#font 7×13
#font 8×13
#font 9×15
#font *mintsmild.se*
#font -*-*-*-*-*-*-34-*-*-*-*-*-*-*# Use Xft?
use_xft no# Set conky on the bottom of all other applications
on_bottom yes# Xft font when Xft is enabled
xftfont Bitstream Vera Sans Mono:size=8# Text alpha when using Xft
xftalpha 0.8# Print everything to stdout?
# out_to_console no# MPD host/port
# mpd_host localhost
# mpd_port 6600
# mpd_password tinker_bell# Print everything to console?
# out_to_console no# mail spool
# mail_spool $MAIL# Update interval in seconds
update_interval 0.5# This is the number of times Conky will update before quitting.
# Set to zero to run forever.
total_run_times 0# Create own window instead of using desktop (required in nautilus)
own_window yes# If own_window is yes, you may use type normal, desktop or override
own_window_type override# Use pseudo transparency with own_window?
own_window_transparent yes# If own_window_transparent is set to no, you can set the background colour here
own_window_colour hotpink# If own_window is yes, these window manager hints may be used
#own_window_hints undecorated,below,sticky,skip_taskbar,skip_pager# Use double buffering (reduces flicker, may not work for everyone)
double_buffer yes# Minimum size of text area
minimum_size 280 5# Draw shades?
draw_shades yes# Draw outlines?
draw_outline no# Draw borders around text
draw_borders no# Draw borders around graphs
draw_graph_borders yes# Stippled borders?
stippled_borders 8# border margins
border_margin 4# border width
border_width 1# Default colors and also border colors
default_color yellow1
default_shade_color black
default_outline_color black# Text alignment, other possible values are commented
#alignment top_left
alignment top_right
#alignment bottom_left
#alignment bottom_right
#alignment none# Gap between borders of screen and text
# same thing as passing -x at command line
gap_x 12
gap_y 12# Subtract file system buffers from used memory?
no_buffers yes# set to yes if you want all text to be in uppercase
uppercase no# number of cpu samples to average
# set to 1 to disable averaging
cpu_avg_samples 2# number of net samples to average
# set to 1 to disable averaging
net_avg_samples 2# Force UTF8? note that UTF8 support required XFT
override_utf8_locale yes# Add spaces to keep things from moving about? This only affects certain objects.
use_spacer no# mldonkey_hostname Hostname for mldonkey stuff, defaults to localhost
# mldonkey_port Mldonkey port, 4001 default
# mldonkey_login Mldonkey login, default none
# mldonkey_password Mldonkey password, default none# boinc (seti) dir
# seti_dir /opt/seti# Allow for the creation of at least this number of port monitors (if 0 or not set, default is 16)
#min_port_monitors 16# Allow each port monitor to track at least this many connections (if 0 or not set, default is 256)
#min_port_monitor_connections 256# none, xmms, bmp, audacious, infopipe (default is none)
#xmms_player none# variable is given either in format $variable or in ${variable}. Latter
# allows characters right after the variable and must be used in network
# stuff because of an argument# stuff after ‘TEXT’ will be formatted on screen
TEXT
${color DeepPink1}$nodename – $sysname $kernel on $machine
${color green}$stippled_hr
${color lightgrey}CPU Freq:$color $freq_dyn_g GHz
${color green}$stippled_hr
${color lightgrey}Uptime:$color $uptime ${color lightgrey}- Load:$color $loadavg
${color lightgrey}CPU Usage:${color #cc2222} $cpu% ${cpubar}
${color red}${cpugraph 0000ff 00ff00}
${color lightgrey}RAM Usage:$color $mem/$memmax – $memperc% ${membar}
${color lightgrey}Swap Usage:$color $swap/$swapmax – $swapperc% ${swapbar}
${color lightgrey}Processes:$color $processes ${color grey}Running:$color $running_processes
${color green}$stippled_hr
${color lightgrey}Networking:
Down:${color #8844ee} ${downspeed eth0} k/s${color lightgrey} ${offset 80}Up:${color #22ccff} ${upspeed eth0} k/s
${color #0000ff}${downspeedgraph eth0 32,150 ff0000 0000ff} ${color #22ccff}${upspeedgraph eth0 32,150 0000ff ff0000}
${color green}$stippled_hr
${color lightgrey}File systems:
/ $color${fs_used /}/${fs_size /} ${fs_bar /}
/home $color${fs_used /home}/${fs_size /home} ${fs_bar /home}
/ubuntu $color${fs_used /ubuntu}/${fs_size /ubuntu} ${fs_bar /ubuntu}
${color green}$stippled_hr
${color #88aadd}${alignc}$mpd_status
${color}Name PID CPU% MEM%
${color #ddaa00} ${top name 1} ${top pid 1} ${top cpu 1} ${top mem 1}
${color lightgrey} ${top name 2} ${top pid 2} ${top cpu 2} ${top mem 2}
${color lightgrey} ${top name 3} ${top pid 3} ${top cpu 3} ${top mem 3}
${color lightgrey} ${top name 4} ${top pid 4} ${top cpu 4} ${top mem 4}
${color lightgrey} ${top name 5} ${top pid 5} ${top cpu 5} ${top mem 5}
${color green}$stippled_hr
${color #ddaa00}Port(s)${alignr}#Connections
$color ALL: ${alignr}$color ${tcp_portmon 1 65535 count}
$color mpd: ${alignr}$color ${tcp_portmon 6600 6600 count}
$color sshd: ${alignr}$color ${tcp_portmon 22 22 count}
$color torrent: ${alignr}$color ${tcp_portmon 6881 6999 count}
${color #ddaa00}Remote Address ${alignr} Local Service/Port$color
${tcp_portmon 1 65535 rhost 0} ${alignr} ${tcp_portmon 1 65535 lservice 0}
${tcp_portmon 1 65535 rhost 1} ${alignr} ${tcp_portmon 1 65535 lservice 1}
${tcp_portmon 1 65535 rhost 2} ${alignr} ${tcp_portmon 1 65535 lservice 2}
${tcp_portmon 1 65535 rhost 3} ${alignr} ${tcp_portmon 1 65535 lservice 3}
${tcp_portmon 1 65535 rhost 4} ${alignr} ${tcp_portmon 1 65535 lservice 4}
${tcp_portmon 1 65535 rhost 5} ${alignr} ${tcp_portmon 1 65535 lservice 5}
${tcp_portmon 1 65535 rhost 6} ${alignr} ${tcp_portmon 1 65535 lservice 6}
${tcp_portmon 1 65535 rhost 7} ${alignr} ${tcp_portmon 1 65535 lservice 7}
${tcp_portmon 1 65535 rhost 8} ${alignr} ${tcp_portmon 1 65535 lservice 8}
${tcp_portmon 1 65535 rhost 9} ${alignr} ${tcp_portmon 1 65535 lservice 9}
${tcp_portmon 1 65535 rhost 10} ${alignr} ${tcp_portmon 1 65535 lservice 10}
${tcp_portmon 1 65535 rhost 11} ${alignr} ${tcp_portmon 1 65535 lservice 11}
${tcp_portmon 1 65535 rhost 12} ${alignr} ${tcp_portmon 1 65535 lservice 12}
${tcp_portmon 1 65535 rhost 13} ${alignr} ${tcp_portmon 1 65535 lservice 13}
${tcp_portmon 1 65535 rhost 14} ${alignr} ${tcp_portmon 1 65535 lservice 14}
左倾45度 在 2008年01月04日 20:38 说:【 】
不喜欢这东东,麻烦……….不过做的好看的确很赞!